Quantcast
Channel: Knitting And Things » Uncategorized
Viewing all 32 articles
Browse latest View live

Mediums used in Mixed Media

$
0
0

I am going to be doing posts in coordination with Edie’s Tuesday Schmoozeday shows. I will post the show on the bottom for you to watch the products is action and I will explain the products so you can not only read and learn but watch them in action! Here is part one in the Mediums used in Mixed Media articles!

Gesso
Gesso is a priming agent that Artists use to prime their canvas. The Mixed Media community has adopted it as one of their own due to the fact gesso can be used in many ways.
First, let’s talk about Gesso and what it is used for. When prepping a surface you can use gesso to stiffen the paper, canvas or whatever substrate you are using. It helps prevent the paint from soaking in to the paper and it allows you to get a truer color when painting. It can also be used to gesso clay or any item you will be painting on. The consistency is that of watered down paint and you can use it to add a bit of texture on your substrate as well. It is also a wonderful way to make items acrylic paint ready. Since acrylic paint won’t adhere to some substrates, simply applying gesso to it first will help your acrylic stick to anything, including plastic and glass.
There are basically two types of gesso, student and artist. Student gesso is a less pigmented version and definitely cheaper in price. I like the student grade and use this often because you can add acrylic paint to it and you will have a base color which is mixed with gesso. This helps eliminate drying time and saves you money. Think about it as if you are buying paint for your walls with primer in it already. Artist grade gesso is much more opaque and thicker. You can swirl it on your canvas with a palette knife and add color to it too. Textures vary by brand. Some brands are thicker and grainier and some are smoother. They come in different thickness grades as well, such as light, heavy, and super heavy.
Gesso also comes in different base colors, such as black, white, clear, and other hues. Now, as I stated before you can just buy white and color it any color you want. I like to have these three on hand for different reasons. I also like to have the jars as well as the bottles on hand for different reasons. I get better control with the jars but love the bottles for when doing a larger project and for me bottles are easier for me to mix with colors as I can squirt out what I want to use and then mix. Clear gesso is my favorite as you can gesso over a color or whatever you have and paint right over it! You can also store it in air tight containers if you have any left or if you want to build your own collection of colored gesso. Gesso also comes in a spray can form that you can spray on your substrate just like a primer. I don’t use this as often because you have to use it in a well-ventilated area or outside. But, it is nice to have for different projects. There are so many different types of gesso, and they all have their place for use in different crafts.
GEL MEDIUMS
Gel Mediums…How I love thee…. There are many types of gel mediums we are going to go through and I love them all! Let’s start with white school glue. Yes, I said white school glue. I save jars with lids, wash them out well and squirt tons of white school glue into the jar. I then add water to thin it out a bit and stir and stir. I now just made glue to collage my papers on with! That easy and simple! If you are dabbling in mixed media but do not have the money to buy all the things you need, this is the best thing for you to do! Mod Podge is another inexpensive item to buy that now comes in so many variations and is a step up from white glue and water (as well as Collage Pauge by Traci Bautista). These would be considered student-grade gel mediums.
Now let’s get into Artist grade. Golden, Liquitex, Winsor Newton, and list goes on and on of what brands have gel mediums. You can get matte or glossy thick or fluid, it all depends on what you are looking for. Gloss mediums give a glossy effect once dry on your project. You can mix paint in with these as well as you can with the matte ones which dry unreflective and flat. Fluid medium helps the paint flow better from paint brush to substrate and gives a glaze look to your work. These do not water down or change your paint colors at all.
Some fun ideas to use with the gel mediums are to add small rocks, sand, pencil shavings, crayon shavings, glitter and other household items to it. Use your imagination and you can use these types of mixtures to put on finishing touches instead of applying it underneath your project!
These mediums can also be used as a collage adhesive and as a “varnish.” Once your painting is done, lightly brush on the gel medium of your choice and let it dry. It will protect your work and seal it. It can also be used as a resist. You can get so many different uses from gel mediums! No matter the price, it is great to have around.
GLAZING MEDIUM
Glazing medium is a clear thin liquid that “waters down” your paint without losing color. Once dry it is waterproof. Glazing medium is such a fun thing to play with and has so many uses. If you use watercolor pencils, crayons or paints and activate them by using the glazing medium they will become permanent! I love this because I have been known to use my watercolors and forget that they are reactivated with water and ruin my whole painting! It is also great to use as a wash when you add your paint to it. It becomes see-through to a point so you can add layer upon layer if you like. As it dries it becomes level with no bumps or brush strokes.
MOLDING PASTE
Molding or modeling paste is a fantastic way to add texture to your project. It come is various weights and many people use spackle from the home improvement store in place of it. You can add color or any type of items to it and build on it as it dries hard. It also keeps the shape of whatever you have imprinted in it. You can use stamps, draw with end of paintbrush or whatever you come up with to add texture to your project. My favorite way is to take a palette knife and use it to lightly put the molding paste on my paper (you can even color the paste) and then I let it dry to add a great touch of texture. The heavier and thicker the paste is, the more it will hold peaks and shapes.

Any questions please do not hesitate to ask us! We are here to help and help you learn what will work best for you! Stay tuned for Part 2!!! Here is Edies Show 1 and show #2 HERE


Clay Dolphin and Resin

$
0
0

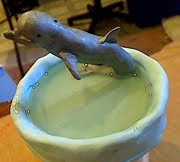
I love mixing products together. I was watching a Documentary on Dolphins and it gave me an idea to try with clay and resin.
First thing I did was make a piece with polymer clay ( you can also use paperclay) and used a wire to attach the dolphin as if he was jumping out if the water. Once that was done, I baked it according to the clay instructions and got ready for the next step!

Next I mixed the Amazing Clear Cast Resin (according to the directions) and poured it into my “water” part in my piece. Here is my finished piece.

 I have been in love with making items like this lately as I also made a Snowman family on ice to sit around the house at the holiday time.

Always think outside of the box with these Resin and Amazing Mold Putty products. They are so awesome and can make some really great Art to sit around the house!

Composimold on my Tuesday Schmoozeday!

$
0
0

New product ComposiMold Reusable Mold Making Material I used on my live show tuesday schmoozeday…. It really is a cool and recyclable product and will definitely use it again! You can watch my show here

Influenster Review – Holiday VoxBox 2012

$
0
0

I am in love with the things I received in my influenster box this month! I will start with the NYC New York Color Liquid Lipshine. It is NOT sticky and has vitamins in it to help heal your lips and keep them soft while you wear it. I received a neutral shade and I love it but it does come in 10 different shades and I am so excited to try them all out.
The Kiss nail dress is next and my daughter tried those since she is the nail polish queen here. They do not stay on as long as they say they do and if you do not get them on perfectly they lift off quickly. Also if you have your hands in water alot, these are not for you. Now for the good things about these, if you are going out for an evening and do not have time to paint your nails, these are nice to have!
I loved the Quaker® Real Medleys Oatmeal+. This is right up my alley. They are healthy and delicious. They are individual cups that you can microwave or I used hot water and they have whole grain oats, rye, barley and wheat and real chinks of fruit. These are healthy and great for on the go families. I will definitely buy these.
The Goody® QuikStyle Brush Paddle is AWESOME!!!! It has absorbent microfiber bristles that remove up to 30% of water as you style whether you just brush your hair while it is wet OR blow it dry! This is a must have. It works exactly as it says it does and I will definitely buy another one when I need it.
EBOOST is a powder that you put into your water with natural ingredients that will help you boost your immunity and mood. It is better than Red bull or any of those types of drinks and comes in different flavors. The taste reminds me of Crystal light and I didn’t notice too much of a difference but I am wondering if I drank it everyday if it would help.
So over all I am thrilled with the Holiday Vox Box with Influenster!!!!! I also tweeted about it!

Polymer Clay Master Class by Judy Belcher and Tamara Honaman–Book Review

$
0
0

I have to admit it – I am a book addict, but I get really excited when it comes to checking out new Arts or Craft books. I just love seeing people’s fresh ideas and the art they can come up with. But, while every Arts and Crafts book has something to offer, not all of them are really worth the rather costly price tag that’s so often stamped on the jacket. But for the most part, for every book that I am disappointed in, I tend to find dozens that make me want to delve back into many times over for inspiration and ideas.

Polymer Clay Master Class by Judy Belcher and Tamara Honaman fits in the latter group. This book is going to go on my “go-to” book shelf. Not only is it fantastic eye candy, but Judy, Tamara, and the rest of the featured artists provide a treasure trove of fantastic techniques using different mediums on a wide number of projects. Polymer Clay Master Class allows you to get up close and personal with the 11 master artists who are included in the collaboration and the most beautiful Art they come up with using Polymer Clay.

The book includes five different lessons and sixteen guided projects that I believe are accomplishable for any level of polymer clay artist. Whether you want to make figurines, jewelry, or other works of art in Polymer Clay, this colorful and exciting book offers an endless resource for inspiration and guidance. You’ll learn from the masters how to do cane work, skinner blends, polymer clay carving, and so much more and best of all, the book not only provides you with the basics you need to know, but then it shows you the incredible results you can achieve by putting them into action.

Polymer Clay Master Class is published by Potter Craft through The Crown Publishing Group and it’s priced at $22.99. It’s a beautifully made book featuring 160 colorful and informative pages and it’s sure to become one of your favorites, just like it is mine. they also have a facebook page here

You can find it on Amazon for a fantastic price HERE

Bracelet Blanks with Amazing Mold Putty

$
0
0

I can’t tell you how many times I have wanted to make a bracelet and haven’t had a blank here for me to use. I have an empty cardboard tape roll that I use in my mixed media and it fits my wrist with a bit of room so I thought hmmmmmmmm….I can make as many blanks as I want out of AMAZING MOLD PUTTY!!!!!!
So here is what I did. I took my AMP and mixed quite a bit of it. I then pushed my empty cardboard roll in it and let it set. It literally takes 10 minutes.

You can see when I mixed my resin I used a silver colorant and poured a bunch of molds so I had a choice of what I wanted on my bracelet. Now you can wrap the bracelet with whatever you want to and as many different textures or colors but I used eyelash yarn in rust.

As I wrapped it I use hot glue to tack every 10 wraps or so just for extra security. I then decided what piece I wanted to use as the main focus on the bracelet.I decided the Victorian woman would be the choice for this one. I hot glued her on and then used perfect pearls to colorize her and highlight her to match the yarn.

Now you can paint the cast or whatever you want. Its hard to get the best picture with the lights on the shining face but in person it is so beautiful! I can make so many different kinds now and wear with my outfits and use whatever theme I want! Your imagination is the only thing that can stop you with this great product!

QUEEN OF ME

$
0
0

I love Amazing Mold Putty and I say it every post. My time on the Design Team is winding down and I am starting to get sad. I love it and I love all the creative uses for it.
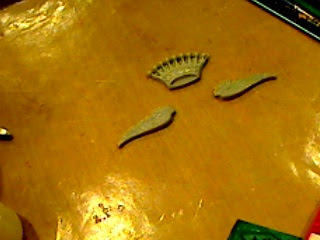
For this month I made a tag for someone as a RAK and used AMP and Resin for the crown and wings. I used Gun Metal Metallic Powder from Alumilite and added a bit of glitter for some detail.
First I inked up the tag with a lot of different inks and paints to make a cool background. Then I drew a quick face and body on it and used a creme color acrylic paint and painted it. I loved the color from the base coming through to the body and face.I mixed my and made my molds and then poured my Resin with a tiny bit of the powder.

I added eyes and embelleshments and the word FLY in glitter on top. I left the hole open so it can be hung. I love the way this came out and am so happy with it! Please try this product! The things you can do with are endless!

AMAZING MOLD PUTTY BLOG HOP ON SATURDAY!


Owl Statue for my garden

$
0
0

UGH- This is my last month on the Amazing Mold Putty Design team. I am a bit sad. I really do love this product and will miss the team. I will however, continue to use the resin and AMP because it is one of my favorite craft supplies as I say all the time!
For my last project I molded an Owl I got for Halloween. I am on of those people who have Halloween and odd things sit around the house all year ON PURPOSE! I molded just the owl off of the piece so i can then add it to a base and put it in my garden. As you can see I painted it bright colors to add to the garden of vegetables and flowers and I love having these things set around my flower beds and such. One of my first AMP projects I did was a statue I got from the dollar store so I could use it outside for the same reason!
What I did first was molded the owl. I did not mold the bottom part as I knew I wanted to attach it to a few branches from outside. (THERE IS MY ADORABLE BABY SPYRO JAMES WALKING AROUND…I COULD NOT EDIT HIM OUT!)
Once it set I then mixed my Resin and added a bit of silver to it. I wanted to see if I wanted to keep it silver or paint it.

Once it cured I decided I wanted it bright so I painted (which AMP takes paint wonderfully)the owl bright green, added iridescent blue eyes, pupils, a beak and dry brushed a darker green all over it. Now I need to do a clear coat on it and paint a wooden heart I got from the craft store and glue this to it and set it out in the garden. I LOVE IT!

I want to thank Terri Sproul and the AMP Design Team and the company itself for Blessing me with this opportunity to be on your Design Team for a year! It is by far one of my favorite products and things I have done!

And one last thing…I have also been Blessed to have my Octopus now on the Amazing Mold Putty and Casting Resin Boxes! Thank you!

COLLAGE 101-TUESDAY SCHMOOZEDAY

$
0
0


Wow! It has been such a long time since I have done a Live Tuesday Schmoozeday show! I was nervous but once I saw all my peeps there I was back in business baby! I had a blast and want to thank everyone who showed up and welcomed me back with such love and open arms! i am truly Blessed!
My show was about Collaging. Collage 101 to be exact and this is just the tip of the iceberg of all you can do with collage. Here are the pictures I did (I showed 2 types of collage) and almost have finished. You can add things for days with collaging!

Collage with purposeSTENCILS-Mixed media Collage

I used our new stencils with the second one. You can find them here You can watch the replay HERE You might have to refresh page if video doesn’t start. (just scroll down the page!)

I am also adding my replay of my show and I hope you will watch and enjoy it and if you have any questions, PLEASE ASK! I have a great group called Kellys Creative Corner. It is free to join and we have alot of fun trades , projects, swaps and so much more!!! I hope to see you there!

DREAM YOUR SUCCESS FREE WEBINAR

$
0
0

Have You Signed Up for the FREE Webinar? Do you sell online? Or perhaps you are thinking about it, or would you like to sell more than you currently do?

Do you know who your customer REALLY is? You might think you do, but many struggling online sellers really don’t have a clue. They throw darts (in the form of products) and hope that inspiration strikes someone, somewhere, who will buy something.

Get focused! On May 10 at 11:30am EST, we are doing a LIVE FREE Webinar designed especially for you to narrow your focus so you can shoot shiny laser beams at your perfect customer, in the form of products they will love and want to own.

http://dreamyoursuccess.com/inspiration/launch-party-free-webinar-your-perfect-customer/

EMPTY TOILET PAPER/PAPER TOWEL ROLL FUN!

$
0
0

HI everyone! I hope this post finds you all doing well. We had a great Tuesday Shmoozeday this week with 3 live shows and great demos. Thank you to everyone who was there and chatted and everyone who watched our replays.
On my show I took empty toilet paper and paper towel rolls and showed you a few things you can do with them. It is endless the fun you can have with these but a few things I showed were book marks, a mini book and talked a bit about decorating them. You can watch the replay here and I also added a new video of another thing you can do on my youtube
http://www.youtube.com/user/knittingandthings
Thank you all so much for all the support you give us! Many Blessings!!!!

NEW BEGINNINGS

$
0
0

Two words that have great meanings separately but together…are so powerful! It has been a very hard month for me. Actually this is the second worse month of the year for me, the first being December. That is the month my son committed suicide. He was 19. This year on May 29, he would of been 22.
I also made a business decision to go back on my own creating and doing my art and jewelry. Having chronic illnesses and the medicines you must take are pure hell. My energy level is low and I want to create for me and when I am able. It is just much more satisfying to me. And I don’t beat myself up for not being able to do for others.
I have learned lessons over the years that I wish I didn’t have to. When I first got ill at 28, I lost friends, very close friends or so I thought, due to me not being able to hang out all day at the pool anymore or do all the things we used to. They dropped like flies. That happened quite a bit through my journey. When my son passed we were flooded by people supporting us and his memorial was packed but two, three weeks passed and everyone went back to normal and we didn’t exist in the same way. Understandable as the tragedy didn’t happen to them but still sad as to this day we still suffer his loss greatly. I went through a period of sadness and meaness and I fought with everyone who crossed me. Those who understood the pain I was in just let me go with the feelings, others walked away, sometimes making the situation worse to get me going even more without understanding or caring that I was in pain. I always wondered what they would of felt like or acted like if they lost one of their children.
But I am older now-maybe more mature? I don’t fight or care what others say about me. I have learned that I am the only one it affects. They do not care, they say and act as they choose-and move on to the next thing and I am stuck in hate, anger and betrayal. I am letting it all go and moving on. And I hope you do too as everyday small things happen that change your mood instantly. We shouldn’t let it! Find the people who love you, follow you, are there for you and hold on to them. Concentrate on them but mostly concentrate on yourself. For every one person who does not like you or talks about you or whatever, there are 5 who DO love you and like you!!!! I have many friends who love me for me and those outweigh any of the bad ones. BE KIND TO YOURSELF!!!!!!!!
I haven’t Art Journaled in a long time. Recently my friend Annie opened an art journal group where she puts up songs and you listen to them and journal how it makes you feel or what you get from the song. I did the first prompt and it made me remember just how much I do love painting and drawing and everything I haven’t done in so long! It made me feel better about my situation and got the ball rolling to keep making Art. I am very thankful because I am now creating MY art daily! Here is the group if you want to join. It is private so no outsiders can see if you are sensitive with sharing how you feel. https://www.facebook.com/groups/artjournalwithannie/
Thank you for baring with my rant and here is to all of us and NEW BEGINNINGS! I am going to add the 2 videos I did for the first song in the group and if you like it please sub to my youtube as I put new stuff up several times a week!

Mediums used in Mixed Media

$
0
0

Gesso
Gesso is a priming agent that Artists use to prime their canvas. The Mixed Media community has adopted it as one of their own due to the fact gesso can be used in many ways.
First, let’s talk about Gesso and what it is used for. When prepping a surface you can use gesso to stiffen the paper, canvas or whatever substrate you are using. It helps prevent the paint from soaking in to the paper and it allows you to get a truer color when painting. It can also be used to gesso clay or any item you will be painting on. The consistency is that of watered down paint and you can use it to add a bit of texture on your substrate as well. It is also a wonderful way to make items acrylic paint ready. Since acrylic paint won’t adhere to some substrates, simply applying gesso to it first will help your acrylic stick to anything, including plastic and glass.
There are basically two types of gesso, student and artist. Student gesso is a less pigmented version and definitely cheaper in price. I like the student grade and use this often because you can add acrylic paint to it and you will have a base color which is mixed with gesso. This helps eliminate drying time and saves you money. Think about it as if you are buying paint for your walls with primer in it already. Artist grade gesso is much more opaque and thicker. You can swirl it on your canvas with a palette knife and add color to it too. Textures vary by brand. Some brands are thicker and grainier and some are smoother. They come in different thickness grades as well, such as light, heavy, and super heavy.
Gesso also comes in different base colors, such as black, white, clear, and other hues. Now, as I stated before you can just buy white and color it any color you want. I like to have these three on hand for different reasons. I also like to have the jars as well as the bottles on hand for different reasons. I get better control with the jars but love the bottles for when doing a larger project and for me bottles are easier for me to mix with colors as I can squirt out what I want to use and then mix. Clear gesso is my favorite as you can gesso over a color or whatever you have and paint right over it! You can also store it in air tight containers if you have any left or if you want to build your own collection of colored gesso. Gesso also comes in a spray can form that you can spray on your substrate just like a primer. I don’t use this as often because you have to use it in a well-ventilated area or outside. But, it is nice to have for different projects. There are so many different types of gesso, and they all have their place for use in different crafts.
GEL MEDIUMS
Gel Mediums…How I love thee…. There are many types of gel mediums we are going to go through and I love them all! Let’s start with white school glue. Yes, I said white school glue. I save jars with lids, wash them out well and squirt tons of white school glue into the jar. I then add water to thin it out a bit and stir and stir. I now just made glue to collage my papers on with! That easy and simple! If you are dabbling in mixed media but do not have the money to buy all the things you need, this is the best thing for you to do! Mod Podge is another inexpensive item to buy that now comes in so many variations and is a step up from white glue and water (as well as Collage Pauge by Traci Bautista). These would be considered student-grade gel mediums.
Now let’s get into Artist grade. Golden, Liquitex, Winsor Newton, and list goes on and on of what brands have gel mediums. You can get matte or glossy thick or fluid, it all depends on what you are looking for. Gloss mediums give a glossy effect once dry on your project. You can mix paint in with these as well as you can with the matte ones which dry unreflective and flat. Fluid medium helps the paint flow better from paint brush to substrate and gives a glaze look to your work. These do not water down or change your paint colors at all.
Some fun ideas to use with the gel mediums are to add small rocks, sand, pencil shavings, crayon shavings, glitter and other household items to it. Use your imagination and you can use these types of mixtures to put on finishing touches instead of applying it underneath your project!
These mediums can also be used as a collage adhesive and as a “varnish.” Once your painting is done, lightly brush on the gel medium of your choice and let it dry. It will protect your work and seal it. It can also be used as a resist. You can get so many different uses from gel mediums! No matter the price, it is great to have around.
GLAZING MEDIUM
Glazing medium is a clear thin liquid that “waters down” your paint without losing color. Once dry it is waterproof. Glazing medium is such a fun thing to play with and has so many uses. If you use watercolor pencils, crayons or paints and activate them by using the glazing medium they will become permanent! I love this because I have been known to use my watercolors and forget that they are reactivated with water and ruin my whole painting! It is also great to use as a wash when you add your paint to it. It becomes see-through to a point so you can add layer upon layer if you like. As it dries it becomes level with no bumps or brush strokes.
MOLDING PASTE
Molding or modeling paste is a fantastic way to add texture to your project. It come is various weights and many people use spackle from the home improvement store in place of it. You can add color or any type of items to it and build on it as it dries hard. It also keeps the shape of whatever you have imprinted in it. You can use stamps, draw with end of paintbrush or whatever you come up with to add texture to your project. My favorite way is to take a palette knife and use it to lightly put the molding paste on my paper (you can even color the paste) and then I let it dry to add a great touch of texture. The heavier and thicker the paste is, the more it will hold peaks and shapes.

Any questions please do not hesitate to ask !

Clay Dolphin and Resin

$
0
0

I love mixing products together. I was watching a Documentary on Dolphins and it gave me an idea to try with clay and resin.
First thing I did was make a piece with polymer clay ( you can also use paperclay) and used a wire to attach the dolphin as if he was jumping out if the water. Once that was done, I baked it according to the clay instructions and got ready for the next step!

Next I mixed the Amazing Clear Cast Resin (according to the directions) and poured it into my “water” part in my piece. Here is my finished piece.

 I have been in love with making items like this lately as I also made a Snowman family on ice to sit around the house at the holiday time.

Always think outside of the box with these Resin and Amazing Mold Putty products. They are so awesome and can make some really great Art to sit around the house!


STAND-ART JOURNAL PAGE

$
0
0

Well I have been on a roll with Art Journaling thanks to Annies art journal group (https://www.facebook.com/groups/artjournalwithannie/) You can click the link and join. She puts up a song a week and other inspiring art to do.
Here is a pic of this weeks journal page to the song STAND by REM

I made a video on my youtube and you can check it out here to see my quick process. It was a spur of the moment thing this week. i sat down and thought hmmmmmm….. I will just sit and play.


Also I would like to tell you about another cool group, it is called HOPS SWAPS AND DO-WOPS! Here is the link and it is ran by Edie and her friend and its another group I love!!!!! https://www.facebook.com/groups/338900769570085/

I hope you all are creating and getting ready for the weekend!!!!!! Many Blessings!

ART JOURNAL- FACE WITH TEXTURES

$
0
0

I love playing around with all types of mixed media. If I had to guess I probably have 10-15 Art journals-some Moleskin and some that I made-that I have half finished or just a few pages done. Since I have been doing the challenges in Art Journal with Annie I have dug out all my journals and have been arting away. It has inspired me to get back to my roots of journaling and to practice before I get back to doing my Art and selling again. I want to feel as comfortable as I did when I was selling my work, doing commissions and people loved it and I knew I was doing the best I could do. Right now I am getting back to that but have a bit more to go. Art Journaling is such a wonderful thing to do as practice and keeping up with your skills and getting better as you do it. I get excited seeing what song is next in the group to journal to and that is a change for me as I had left my art and love of it fall to waste side for a very long time.
SO before I post my 3 videos that I have done on youtube of redoing pages in my journal that I have experimented on here is a great video of how to make your own journal by Annie called Lets’ Make a Journal: Japenese Stab Binding I am going to try this weekend to make one. I am not good at having patience so I won’t record it LMAO! Here are my 3 new videos. Please sub to my channel and share the post and videos! I really appreciate you all who support me! Many Blessings to you all!!!!!!!
PART 1

PART 2

PART 3

MAKING SPRAY INKS AND ALCOHOL INKS

$
0
0

I love playing around with ideas as much as I love buying art products! I would have everything out there that is available to Art with if I could afford it. I know there are alot of you out there like me who are on a tight budget and can’t always afford to buy the latest greatest art product out there. So I decided to sit and make a couple videos on using food coloring to make ink sprays and alcohol sprays and even added mica powder/perfect pearls to them. I hope this opens up some creativity for you and gives you the incentive to PLAY! Play in your Art journal, play on scrap paper and make backgrounds! It opens up your mind and gives you a freedom that just flows through you and it is so much fun! And the best part????? With summer here you can sit out side with the kids and have a blast with these ideas and let them play and spray and squirt them off with the hose when done!!! I really hope you enjoy these as much as I enjoyed making them!


PLAYING WITH MOD MELTS–

$
0
0

I went to my Michaels last weekend and was very excited to see they finally had MOD MELTS. Of course I picked up everything they had in the section for them, but as I continued to walk through the store I thought to myself “Self….how many times have you got soooo excited over a product, go crazy, buy all of the components and then it sucks?” (haven’t we all done that at least once?) so then I decided to just buy the Milk Glass White Mod Melt sticks and I would use silicone molds I have at home. I have a ton of them, since I love polymer clay, so I went the cheaper route. I must say…… I LOVE THEM! You can use alcohol inks on them, you can paint them AND you can not only use them in silicone molds BUT also Amazing Mold Putty molds that you make!!! (I AM AN AMAZING MOLD PUTTY FREAK!) I did not have any luck using them in plastic molds as they stuck and glued themselves too it, which I kinda thought would happen. AND ANOTHER COOOOL THING……. I STAMPED IN THEM! Now…YES… I know several people have told me I can use regular hot glue and you can but these need NO gesso or any treatment before adding color. Hot Glue I have played with many times and due to the glossiness, for me at least, doesnt take paint as well and I always had to gesso it first. If you have had a different experience–please share! I still use regular hot glue for things but now will be using the Mod Melts in my art and for jewelry. I am excited to buy the clear Melts now and try them! Here are two videos I did showing me playing with them! I say–Use a coupon at Michaels and just buy one pkg (they come 16 large sticks) and PLAY!!!

Faux Mixed Medium and Faux Crackle

$
0
0

I love finding ways to make expensive art products from cheap items we all have sitting around or you can get from the dollar store! I know I have said that a million times! I have 2 well actually 3 videos here that I show how to make your own Gel Medium or Mod Podge and your own Crackle. When I did these I recorded on the youtube site, which I hardly ever do and I hardly will do again since it took 3 times to get the crackle one done! Half way through 2 times it stopped and crashed and I had to start again. So the video isn’t the best but you get the point PLUS i put my original Crackle video I did a few months back in the description and I will put it on here too! It is a much better video and explained much better as I wasn’t as aggravated! Hope you enjoy these! Anything else you want to see, just let me know!


Viewing all 32 articles
Browse latest View live


Latest Images